
Are you an engineering manager or DevOps engineer supporting teams working in a monorepo? Do you happen to use GitHub for source control? If you answered yes to both those questions, read on!
The Need
We have recently migrated our monorepo from self-hosted BitBucket to GitHub. As part of the migration, we were looking for ways to enhance the experience for the various engineering teams that develop the applications and libraries in the repository. As you might imagine, as the number of teams working in your monorepo grows, so does the number of pull requests (PRs) that are created, merged, or deleted. This can be a real headache if you need to find a particular PR.
Enter labels. This often little-used GitHub feature can help you categorize your PRs so that you can later filter the list down to a manageable level and find a PR that might need your attention. It’s easy to add labels to a PR but many times engineers are focused on all the things they need to get accomplished and forget to actually add the labels. Luckily, GitHub offers a pre-built action that you can use to automatically apply labels based on your specific configuration needs. That action is what we’ve implemented in our monorepo.
Creating Meaningful Labels
Having the ability to apply labels automatically is all well and good, but if you don’t have some sort of convention for the names of the labels, they pretty quickly become useless. A year or so ago as I was doing some work with a group of self-hosting / home lab enthusiasts, I was introduced to the concept of using multi-part labels to more easily manage categorization and grouping of your labels. Since you can apply multiple labels to any PR, having multiple parts in a single label is very helpful. Below are some examples that I’ve used to help group labels:
- “stack/*” (angular|react|node|etc) – Labels PRs based on the technology stack. This is very handy in a monorepo that supports multiple technologies.
- “area/*” (my-app-1|some-common-thing|etc) – Labels PRs based on a particular related set of functionality within your app. In our case, we use this to identify which application in the monorepo a particular PR applies to.
- “platform/*” (web|server|mobile) – Labels PRs based on the platform that is affected by the PR. This is especially useful if your monorepo houses web, mobile, and server-side applications.
In addition to these groupings, there are others that can be helpful to assign to issues but are less relevant to PRs as the require manual user intervention to determine which label to apply. Some examples include “size/*” (small|medium|large|xlarge) to indicate the relative effort required for the issue, “priority/*” (low|medium|high|critical) to indicate how important an issue is to fix and “type/* (bug|feature|enhancement|etc) to note what type the issue belongs to.
But I digress…back to our automation!
Applying Rules to Your Repository
Our monorepo uses the excellent Nx toolkit to manage our applications and shared libraries. It provides numerous code generators, executors, and other tooling to make managing large collections of applications and libraries easier. As such, it is fairly opinionated in how to organize your application code. We have adopted the approach recommended by the Nx team to organize our repository. We have a file system structure that looks something like this (apologies for the long code block, we’ll talk more about the structure below so it’s good to visualize it):
/
  - apps
    - angular-app-one
    - react-app-one
    - serverless-app-one
  - libs
    - web
      - angular
        - angular-app-one
          - feature
            - some-lib-one
            - some-lib-two
          - shared
            - data-access
              - some-api-one
            - ui
              - some-lib-one
        - angular-app-two
          - feature
            - some-lib-one
            - some-lib-two
          - shared
            - ui
              - some-lib-one
        - shared
          - data-access
            - some-api-one
          - ui
            - some-lib-one
      - react
        - react-app-one
          - feature
            - some-lib-one
            - some-lib-two
          - shared
            - data-access
              - some-api-one
            - ui
              - some-lib-one
        - react-app-two
          - feature
            - some-lib-one
            - some-lib-two
          - shared
            - ui
              - some-lib-one
        - shared
          - data-access
            - some-api-one
          - ui
            - some-lib-one
    - server
      - serverless-app-one
        - feature
          - some-lib-one
          - some-lib-two
        - shared
          - data-access
            - some-api-one
      - node-app-one
        - feature
          - some-lib-one
          - some-lib-two
        - shared
          - data-access
            - some-api-one
            - some-api-two
    - mobile
      - mobile-app-one
        - feature
          - some-lib-one
          - some-lib-two
        - shared
          - data-access
            - some-api-one
            - some-api-two
        - ui
          - some-lib-one
          - some-lib-two
There are several reasons for the above organization that we don’t have space to go into here. One reason I will highlight though is that it lets engineers immediately see the context in which a particular library is supposed to be used just by where it is on the directory tree. Nx even allows you to automatically enforce boundaries to ensure applications aren’t importing libraries that should be private to a different application. If you’re interested in reading more, this article on Nx.dev talks more about it.
Suffice it to say that having a well-organized file structure fits neatly in with a well-organized label naming convention–especially as the number of applications, libraries, stacks, and platform grows. Using the GitHub action we mentioned earlier, we can create a labeler.yml file in the .github directory like below. It simply lists the labels you wish to apply and the glob search patterns to use on files changed by a PR.
# This file manages the labels automatically applied to PRs based on the files changed

platform/web:
- libs/web/**/*
- apps/angular-app-one/**/*
- apps/react-app-one/**/*

platform/server:
- libs/server/**/*
- apps/node-app-one/**/*

stack/angular:
- libs/web/angular/**/*
- apps/angular-app-one/**/*

stack/react:
- libs/web/react/**/*
- apps/react-app-one/**/*

stack/node:
- libs/server/node-app-one/**/*
- apps/node-app-one/**/*

area/shared:
- libs/web/angular/shared/**/*
- libs/web/react/shared/**/*

area/angular-app-one:
- libs/web/angular/angular-app-one/**/*
- apps/angular-app-one/**/*

area/react-app-one:
- libs/web/react/react-app-one/**/*
- apps/react-app-one/**/*

area/node-app-one:
- libs/server/node-app-one/**/*
- apps/node-app-one/**/*
Our use case lends itself to using the file system structure for defining rules. However, the labeler action allows you to get more creative as well. For example, you could include a rule to apply the “area/documentation” label to a PR any time a README file was updated anywhere in the repository. So, think outside the box (tree) and create rules that make sense for your repository.
Now that we have our configuration file, all that is left is to create the workflow referencing the action. Create a file named .github/workflows/labeler.yml and put the following inside:
name: "Pull Request Labeler"
on:
- pull_request_target

jobs:
  triage:
    runs-on: ubuntu-latest
    steps:
    - uses: actions/labeler@v3
      with:
        repo-token: "${{ secrets.GITHUB_TOKEN }}"
Commit and push the changes and, from now on, when we create or update a PR, the GitHub action will review the files changed in the PR and automatically assign the proper labels to the PR. Below is the resulting PR view once you have the automatic labeling in place. I like to assign the same color to all the “area”, “platform”, and “stack” labels (but I might be a bit OCD).
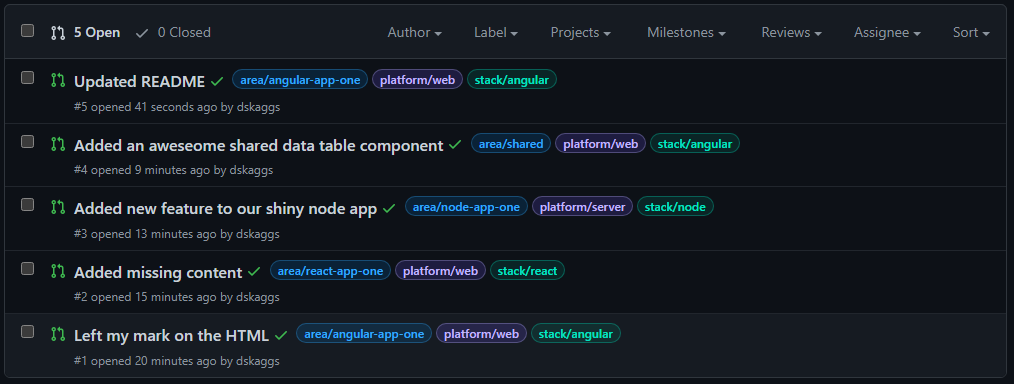
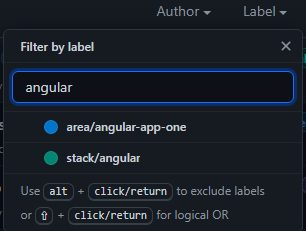
Once you have several open and closed PRs, you can then filter them using the excellent label filtering capabilities that GitHub provides:
Conclusion
Providing engineering teams with tooling that makes them more productive is one of the best investments you can make. Couple that with automating that tooling so the the engineers get the benefits of the tooling without any extra effort on their part and you have yourself a win/win situation in my book!
Note: The repository and PR list on GitHub if you’d care to look for yourself.
Leave a Reply